


How to Pass SheerID Student Verification: Step-by-Step Guide
Everyone loves a good discount, especially students living on a tight budget. Major brands like Spotify, Apple, YouTube Premium, Nike, and Amazon Prime offer amazing student deals that can slash your monthly subscription costs in half.
However, many students get stuck at the final step of the signup process — the identity verification system managed by a third-party company called SheerID. Even if you are a fully enrolled student at a legitimate college, the system can reject your application without a clear reason.
You do not have to miss out on these money-saving offers. The absolute secret on how to pass SheerID student verification is simple: consistency is king. Your official school database records, the information you type into the online signup form, and the text on your uploaded documents must be a 100% literal match. One tiny spelling difference is enough for the automated system to flag your account.
This comprehensive guide will walk you through the entire verification process, explain every common mistake, and show you exactly how to get your student status approved on the very first try.
What Is SheerID and How Does It Work?
SheerID is a legitimate, highly secure third-party identity verification platform. Big retail brands and digital streaming services hire SheerID to protect their discount programs from fraud, ensuring that only eligible students, teachers, or military personnel can access exclusive low-cost pricing tiers.
SheerID currently works with over 15,000 brands worldwide, including Nike, Spotify, Amazon, Microsoft, and Apple. To keep verification fast and secure, the platform uses a two-step mechanism to confirm your student status.
🔸Step 1: Automated Database Matching
When you fill out a student discount application, SheerID does not instantly look at your documents. Instead, it takes your full name, date of birth, and school name and cross-references this data against a massive database of registered educational institutions.
If your university has updated its database and your typed information matches their records perfectly, you pass instantly — often in under a minute.
🔸Step 2: Manual or Machine Document Review
If the automated system cannot find your name in the school database, it will prompt you to upload official documentation. This commonly happens for newly enrolled students or schools that use different spelling formats.
A digital review system or a live customer service agent will then examine your uploaded files to manually confirm your current enrollment. Document reviews typically take between 20 minutes and a few hours. During peak back-to-school seasons, it can occasionally take up to 48 hours.
Step-by-Step Guide: How to Pass SheerID Student Verification
Passing the verification check requires careful preparation. Follow this structured framework closely to maximize your chances of approval on the very first attempt.
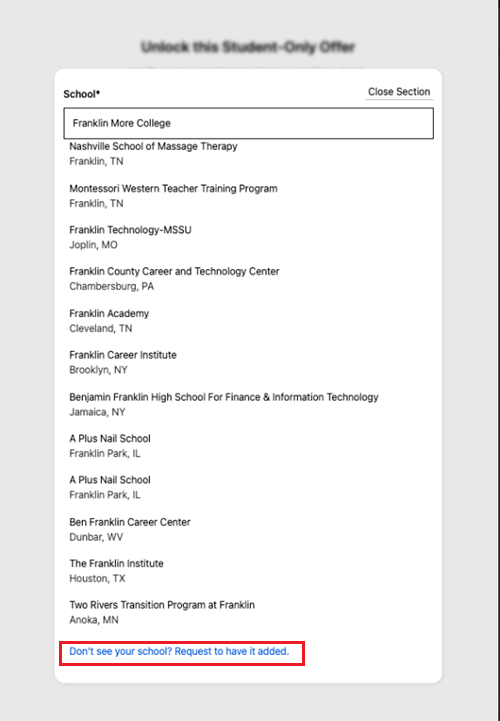
🔹Step 1: Select the Exact School Name from the Dropdown
When you start typing your college name into the SheerID input box, a dropdown menu will appear with pre-approved institution names. You must select your official school name from this list — do not type a casual nickname or acronym.
For example, if you attend the University of California, Los Angeles, you must select that full name. Simply typing "UCLA" will cause the database system to reject your request immediately. If your school name does not appear, scroll to the bottom of the dropdown to find the "Request to add your school" link, which allows you to submit your institution's official website URL for review. SheerID typically processes these requests within a few business days.
🔹Step 2: Enter Personal Information That Exactly Matches School Records
The name you type into the application form must match your official university registrar records exactly. This is a particularly common pitfall for international students.
If your official passport or student visa uses your legal name but your university profile uses a preferred western name, check your official student portal first. Use whatever name appears on your official tuition statements. Do not use shortened nicknames or middle initials unless they are part of your official school file.
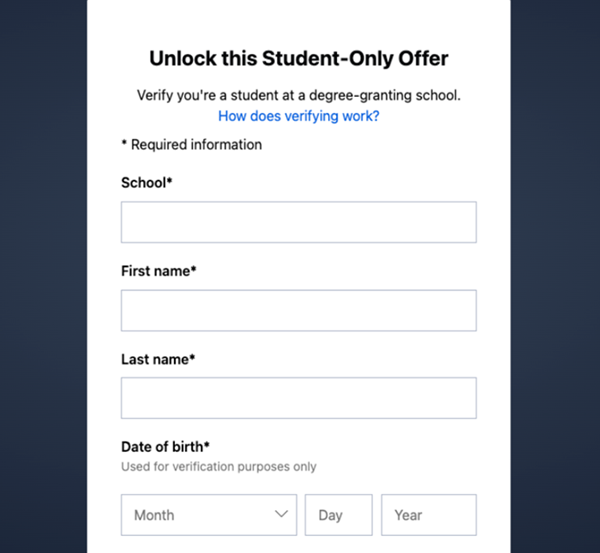
🔹Step 3: Use Your Official School Email Address
Many brands allow you to sign up using a personal Gmail or Outlook address. However, when the SheerID verification form appears, you should always provide your official university-issued email address.
This email address usually ends with a .edu suffix or a regional academic domain like .ac.uk. Providing an official student email gives the automated database scanner an instant trust signal, heavily increasing your chances of passing Step 1 without needing a document upload at all.
Important note for international students: SheerID cross-references your email domain against their internal whitelist. Newer international domains or department-specific sub-domains (e.g., @cs.university.edu) may require manual review cycles. If you receive an "invalid email" error, try your main university root-domain email address instead.
How to Handle Document Uploads Successfully
If the background database check cannot find your name, the system will move to Step 2 and display an upload screen asking for proof of enrollment. This is where most students fail — but passing this step is straightforward once you know what to prepare.
✅ Accepted Documents for SheerID Verification
SheerID accepts several types of official school documentation. You only need to provide one of the following items:
- A school-issued student ID card that shows a clear expiration date.
- Your official class schedule for the current academic semester.
- A recent registration payment or tuition fee receipt.
- An official enrollment letter issued by your university registrar's office (note: acceptance letters are not accepted, as they do not prove current enrollment).
- A recent official or unofficial academic transcript showing classes currently in progress.
You can upload more than one document if a single file does not display all required information. SheerID will review the date of enrollment, not the print date or view date — so a transcript printed today but showing only previous-term classes will still be rejected.
☑️ The Four Vital Elements Your Document Must Include
SheerID will reject your document if it is missing any of these four pieces of information. Check your document before uploading:
- Your Full Legal Name: This must exactly match the name you typed into the signup form.
- The Complete School Name: The document must clearly display the university logo or printed letterhead.
- A Clear, Current Date: The document must prove you are actively enrolled right now — showing the current semester, current academic year, or an active issuance date. Future term acceptance letters are not accepted.
- Proof of Active Enrollment: The document must demonstrate you are taking classes in the current term, not a past or upcoming one.
Editor's Tip: An old student ID card without a printed expiration year is the number one reason applications fail at the document stage. Always use a current-term document.
📝 Document Formatting and Upload Checklist
To prevent machine-reading errors, follow these standards when creating your digital files:
| Requirement Factor | Best Practice Standard | What to Avoid |
|---|---|---|
| File Format | JPEG, PNG, or PDF | GIF, BMP, or Word documents |
| Image Clarity | High-resolution, flat scan | Blurry photos taken in dim rooms |
| Lighting | Even, natural light | Heavy camera flash glare hiding text |
| Edge Framing | Show all four corners of the page | Cropping out headers or footers |
While your document must be clear, you can protect personal privacy by blacking out non-essential sensitive numbers before uploading — such as social security numbers, bank routing numbers, or private medical details. SheerID does not need this data to confirm your student status.
Troubleshooting Failed Verifications: Hidden Technical Traps
What happens if you follow all the basic steps but your application is still denied? There are several hidden errors and algorithmic traps that can trigger a rejection even for legitimate students. Here is how to diagnose and fix each one.
⚠️ Error 1: Typographical or Date Mismatches
Double-check every single character. Did you accidentally include a typo in your date of birth? Does your uploaded transcript show enrollment from a previous semester instead of the current one?
Go back to the form, clear your inputs, and re-type every detail carefully. Ensure what you type in the form perfectly matches what appears in your document text — including spacing, hyphenation, and capitalization.
⚠️ Error 2: Your University Is Missing from the Dropdown List
If your trade school, community college, or international university does not appear in the search box, you cannot proceed normally through the standard flow.
Scroll to the bottom of the school selection dropdown to find the "Request to add your school" link. Click it and fill out the request form with your school's official website URL. The SheerID team will review the request and add your institution to their database, usually within a few business days.
⚠️ Error 3: Verification Limit Exceeded
This is one of the most frustrating errors students encounter. The "Verification Limit Exceeded" message appears when the system has recorded too many failed attempts on your account, locking you out of further tries.
The fix: contact SheerID support directly and request a limit reset. Each brand that uses SheerID also has its own support contact — for example, for Figma-related verifications, you can email [email protected] and clearly explain that you are a legitimate student who has hit the retry limit. Attach a copy of your enrollment documentation in your email to strengthen your appeal.
⚠️ Error 4: Network Environment and Geographical IP Mismatches
This is a major hidden trap that catches many international students and study-abroad participants — and it is one that most guides do not explain clearly.
SheerID uses advanced fraud prevention algorithms that actively check your internet connection's IP address when you submit a verification form. If you are a student registered at a university in New York or London, but your IP address shows you are browsing from a suspicious data center or a low-quality public VPN on the other side of the world, SheerID's fraud detection system will trigger an automatic alarm.
The algorithm flags this as an identity theft risk and may auto-reject your application — even if your documents are completely genuine. This is especially common for:
- International students applying from their home country for a foreign university's discount.
- Study-abroad students whose IP address does not match their enrolled institution's region.
- Students applying from shared dormitory networks or public Wi-Fi hotspots that carry a poor reputation score.
- Anyone using a free or cheap public VPN service, which is one of the clearest fraud signals in SheerID's detection system.
To solve this problem, your online application environment needs to look clean, stable, and geographically consistent with your university's region.
✨ The Professional Solution: OkeyProxy Residential Proxies
If you are applying from an irregular connection, traveling internationally, or facing localized routing issues, the most reliable fix is using a Residential Proxy service — not a cheap public VPN.
We highly recommend OkeyProxy. Here is why it stands apart from ordinary VPN tools when it comes to SheerID verification:
- 150 million+ real residential IPs: OkeyProxy's pool consists of genuine household IP addresses from real home internet connections across 200+ countries — not data center IPs that fraud systems instantly recognize and block.
- City-level geo-targeting: You can select a clean residential IP address located in your university's exact city or even neighborhood. To SheerID's fraud detection algorithm, your traffic appears to originate from a normal local home broadband connection — not a suspicious proxy server.
By routing your connection through OkeyProxy, you eliminate geographic risk flags, ensure your internet presence matches your school's location records, and prevent your student discount application from being accidentally blocked by automated security firewalls.
👉 Try OkeyProxy today and stop getting blocked by IP fraud flags →
What to Do If You Are Still Rejected After Everything
If you have followed every step above and are still getting denied, do not give up. Here is a structured escalation path:
- Submit a SheerID appeal: Reply directly to the rejection email from SheerID and attach fresh documentation — ideally a current-term class schedule or an official enrollment letter. Clearly state your case in writing.
- Contact the brand's education support team: SheerID handles verification, but brands like Figma, Spotify, and Adobe have their own education support teams who can sometimes manually review your case or escalate to SheerID on your behalf.
- Request a verification limit reset: If you have hit the retry limit, email SheerID's brand-specific support address (listed in the verification rejection email) and explicitly request a limit reset, attaching your documentation.
- Check your network environment: Before resubmitting, ensure you are on a clean, residential IP connection. A residential proxy like OkeyProxy is the most reliable way to eliminate IP-related rejection triggers before your next attempt.
FAQ: Quick Reference Guide
Q: How long does SheerID student verification take?
A: If your data matches the school database automatically in Step 1, the process completes in under a minute. If you upload documents for manual review, it usually takes between 20 minutes and a few hours. During heavy back-to-school promotional seasons, it can occasionally take up to 48 hours.
Q: Can part-time students use SheerID to verify?
A: Yes. SheerID's student verification covers both full-time and part-time students enrolled in an educational institution. However, the specific brand running the discount program may have additional eligibility rules — for example, some offers are limited to students at Title IV, degree-granting colleges in the United States.
Q: Can I keep using my student discount after I graduate?
A: No. SheerID requires users to re-verify their active student status typically once every 12 months. Once you graduate and are no longer in the school database, you will fail the re-verification check and your account will automatically revert to a standard retail subscription rate.
Q: Is my personal information safe when I upload documents to SheerID?
A: Yes. SheerID acts as an official, trusted verification partner for global tech companies and follows strict data privacy compliance regulations. Uploaded documents are used solely to confirm your enrollment status. Once verification is marked as approved or rejected, SheerID deletes your uploaded images from their servers to protect your identity.
Q: What if my school does not issue a .edu email address?
A: Many international universities use regional academic domains like .ac.uk, .edu.au, or institution-specific domains. SheerID's system supports these. If your school does not issue institutional email addresses at all, you will typically proceed directly to the document upload step, which is SheerID's fallback for confirming enrollment in such cases.
Q: Why does SheerID check my IP address?
A: SheerID cross-checks specific identity attributes — including your IP address — against third-party sources as part of its fraud prevention layer. Traditional verification methods like email domain checks alone can result in fraud rates above 35%. The IP check is designed to detect identity spoofing and discount abuse. This is why a mismatched or flagged IP can cause even a fully legitimate application to be auto-rejected.
Summary and Key Takeaways
Securing a student discount is an excellent way to enjoy premium software, music streaming, and retail products without breaking the bank. While the SheerID verification process can seem frustrating at first, knowing exactly how the system works behind the scenes makes it entirely manageable.
Always match your data exactly — select your official university name from the dropdown list, use your official .edu email address, and ensure any uploaded transcripts or student ID cards clearly show the current academic year and active enrollment.
If you are applying from an irregular connection, traveling internationally, or simply want to remove every possible rejection risk, protect your application by using a trusted residential proxy service like OkeyProxy to align your location data with your school's region. Gather your current-term documents, prepare your connection, fill out the form carefully — and enjoy your hard-earned student discounts today.
