
If you want to improve online privacy, access blocked websites, or manage internet traffic more effectively, a proxy server is often the solution. A proxy server works as an intermediary between your device and the internet, helping hide your IP address and control how requests are handled. Although setting up a proxy server may seem complicated, this step-by-step guide breaks it down into simple, easy-to-follow instructions.
What Is a Proxy Server?
A proxy server works as a middleman between a user’s device and the websites being accessed. When a request is made to a website, it first goes through the proxy, which processes and forwards it to the destination. The response from the website is then relayed back to the user via the proxy server.
This system helps in masking the user’s IP address, offering better anonymity, and sometimes even boosting internet speed by caching frequently accessed data.
Why Use a Proxy Server?
Proxy servers are popular for a variety of purposes, including:
-
Accessing geo-restricted content: They allow users to view websites that may be unavailable in certain regions.
-
Enhancing privacy: Proxies can hide a user’s IP address, making online activities more private.
-
Filtering internet traffic: Proxies can block certain types of content, making them ideal for workplaces or schools.
-
Bypassing firewalls: They enable access to websites or services blocked by local restrictions.
How to Set Up a Proxy Server (Step-by-Step Guide)
Before configuring a proxy server, it’s important to understand the overall setup flow. No matter which device or browser you’re using, the process follows a similar pattern: obtain proxy details, enter them into network or browser settings, authenticate if required, and finally verify that the proxy is working.
General Steps to Set Up a Proxy Server
In most cases, setting up a proxy server involves the following steps:
- Get proxy details: Obtain the proxy server’s IP address or hostname, port number, and authentication credentials (username/password) from your proxy provider or network administrator. Some providers may require you to whitelist your IP instead of using login credentials.
- Locate proxy settings: Go to your device’s network settings or your browser’s connection settings.
- Choose manual configuration: Find the section labeled “Proxy,” “HTTP Proxy,” or “Manual proxy setup,” and select manual configuration.
- Enter server information: Input the proxy server address (IP or hostname) and port number.
- Authenticate if required: Enter your username and password, or ensure your IP address has been added to the provider’s whitelist.
- Save and test: Save the settings and visit an IP-checking website to confirm that your public IP address has changed.
Once these steps are complete, your internet traffic should be routed through the proxy server.
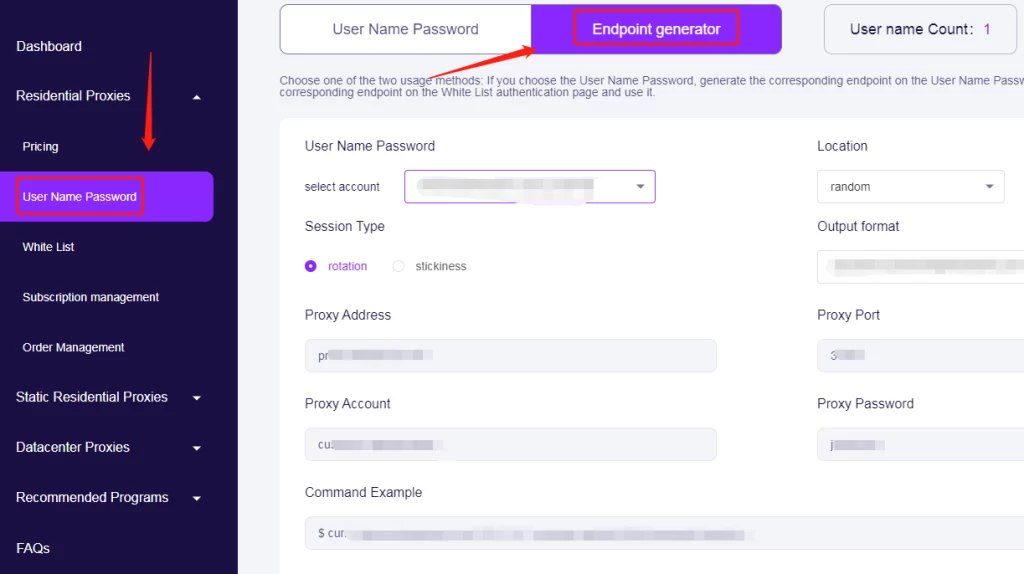
Note: You can visit the official OkeyProxy website and log in or create an account to access the dashboard. From the left sidebar, select the proxy type you need—such as Residential Proxies, Static Residential Proxies, or Datacenter Proxies. Then click “Pricing” to view the available plans for that proxy type. After purchase, you will get an “Endpoint Generator” under the [User Name Password] in the proxy type. You’ll find all the proxy details you need to configure and use your connection.
Set Up a Proxy Server on Operating Systems
On Android
To configure a proxy server on an Android device:
-
- Step 1: Open Settings and go to Wi-Fi to display available networks.
- Step 2: Long-press the connected Wi-Fi network and select Modify network.
- Step 3: Tap Advanced options.
- Step 4: Under Proxy, choose Manual, then enter the proxy hostname and port.
- Step 5: If you’re using a PAC file, select Proxy Auto-Config and enter the PAC URL.
- Step 6: Tap Save to apply the settings.
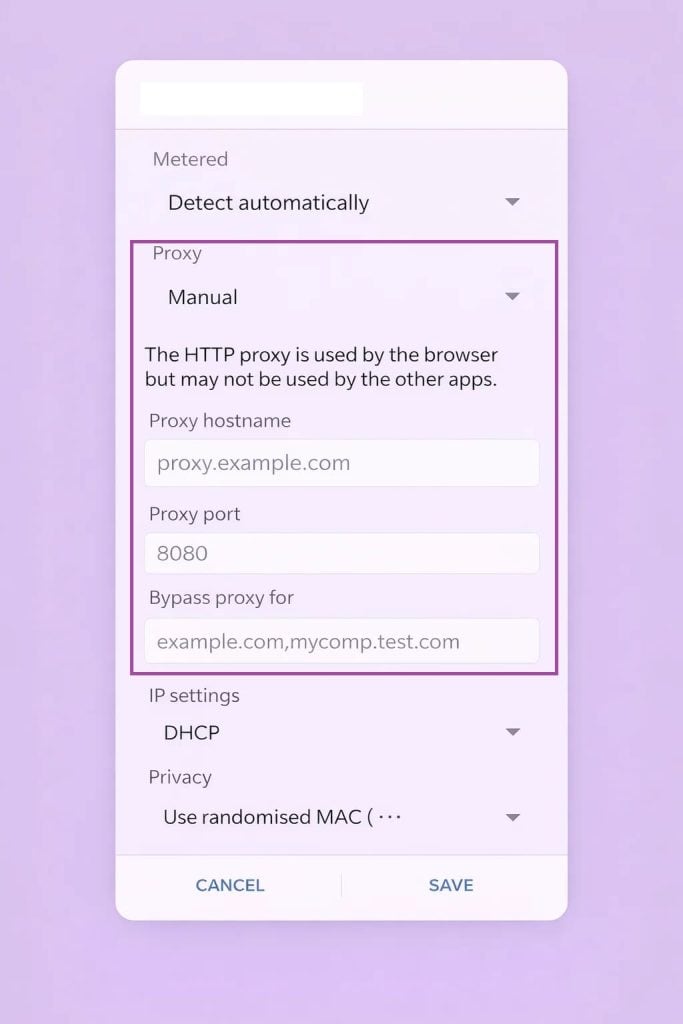
Note: This proxy setting applies only to the current Wi-Fi network. To configure proxies in Android using other methods, please refer to the detailed guide: https://www.okeyproxy.com/proxy/set-proxy-in-android/.
On iOS (iPhone / iPad)
To set up a proxy server on iOS:
-
-
- Step 1: Open Settings and tap Wi-Fi.
- Step 2: Tap the ⓘ icon next to the connected Wi-Fi network.
- Step 3: Scroll down to HTTP Proxy and tap Configure Proxy.
- Step 4: Choose Manual or Automatic (for PAC configuration).
- Step 5: For manual setup, enter the server address, port, and authentication credentials if required.
- Step 6: Tap Save to confirm.
-
The proxy will now be used whenever your device connects to this Wi-Fi network.
On Windows
To configure a proxy server on Windows:
-
-
- Step 1: Press Windows + I to open Settings.
- Step 2: Navigate to Network & Internet > Proxy.
- Step 3: Under Manual proxy setup, toggle Use a proxy server to On.
- Step 4: Enter the proxy server address and port number.
- Step 5: Save the settings.
-
If your network uses a PAC file:
-
-
- Step 1: Go to Automatic Proxy Setup
- Step 2: Enable Use Setup Script
- Step 3: Enter the script address and save
-
On macOS
To set up a proxy server on macOS:
-
-
- Step 1: Click the Apple menu and open System Settings (or System Preferences).
- Step 2: Select Network and choose your active connection (Wi-Fi or Ethernet).
- Step 3: Click Advanced, then go to the Proxies tab.
- Step 4: Choose the proxy type you need (HTTP, HTTPS, or SOCKS).
- Step 5: Enter the proxy server address and port number.
- Step 6: If authentication is required, check Proxy server requires password and enter your username and password.
- Step 7: Click OK, then Apply to save the configuration.
-
You can also use Automatic Proxy Configuration by entering a PAC file URL if provided.
Set Up a Proxy Server in Browsers
Google Chrome
Chrome uses your system’s proxy settings:
-
-
- Step 1: Open Chrome and go to Settings.
- Step 2: Scroll down and click Advanced.
- Step 3: Under System, select Open your computer’s proxy settings.
- Step 4: Configure the proxy by following your operating system’s instructions.
-
Microsoft Edge
Edge also relies on system-level proxy settings:
-
-
- Step 1: Open Edge and click the three-dot menu in the top-right corner.
- Step 2: Go to Settings > System and performance.
- Step 3: Click Open your computer’s proxy settings.
- Step 4: Configure the proxy in Windows settings.
-
Edge will automatically use the proxy defined at the system level.
Mozilla Firefox
Unlike Chrome and Edge, Firefox has its own independent proxy settings:
-
-
- Step 1: Open Firefox and click the menu button (☰).
- Step 2: Go to Settings and scroll to Network Settings.
- Step 3: Click Settings… next to “Configure how Firefox connects to the internet.”
- Step 4: Select Manual proxy configuration.
- Step 5: Enter the proxy IP address and port number.
- Step 6: Click OK to save.
-
All Firefox traffic will now be routed through the configured proxy server.
Use Your Proxy Server
Once set up, the device will route all internet traffic through the proxy server. If authentication is required, enter the credentials provided by the proxy service. Test the setup by checking the device’s IP address online. If the proxy is functioning correctly, the displayed IP should differ from the original.
Key Considerations for Using a Proxy Server
After setting up your proxy server, it’s essential to keep a few key considerations in mind to ensure you’re getting the most out of your proxy service. Here are the main factors to consider when choosing and using proxies:
- Free vs. Paid Proxies: While free proxies are available, they often lack reliability and security. Paid services like Okey Proxy provide enhanced performance and dedicated support.
- Connection Speed: Some proxies may slow down internet speeds. Opting for high-quality services minimizes this issue.
- Security Measures: Always verify that the proxy provider uses encryption and other safety features to protect sensitive data.
With these considerations in mind, setting up and using a proxy server becomes a seamless experience. Whether you’re looking to improve your online privacy, bypass restrictions, or manage internet traffic more effectively, proxies are indispensable tools in today’s digital landscape.