Whether you are trying to bypass regional content blocks, manage multiple social media accounts, or scrape data without getting your IP banned, the right proxy setup is your foundation. Among the various protocols available, SOCKS5 stands out as the most versatile and reliable choice for modern internet users. However, even the best proxy is useless if you don’t know how to set it up correctly. In this comprehensive guide, we will walk you through everything you need to know about SOCKS5 configuration, from basic parameters to step-by-step instructions for every major operating system and device.
SOCKS5 Proxy 101: Understanding the Protocol
A SOCKS5-Proxy is a “Socket Secure” internet protocol that routes your network packets through a proxy server. Unlike standard HTTP proxies that only handle web traffic, SOCKS5 operates at Layer 5 of the OSI model, meaning it can handle any type of traffic — including HTTP, HTTPS, FTP, and even UDP (essential for gaming and streaming).
SOCKS5 vs. Older SOCKS Versions
If you have spent any time in the proxy world, you have likely seen “SOCKS4” mentioned alongside SOCKS5. While SOCKS4 was a solid foundation, SOCKS5 is a significant upgrade. The primary differences are that SOCKS5 supports UDP-Verkehr and provides advanced authentication methods, ensuring that only authorized users can access the proxy server. For a deeper dive into these technical differences, you can read our detailed comparison on SOCKS4 vs. SOCKS5.
SOCKS5 vs. HTTP vs. VPN: Which Should You Use?
Choosing the right tool depends on your specific needs for speed, security, and traffic type. Below is a breakdown of how SOCKS5 stacks up against common alternatives:
| Merkmal | SOCKS5-Proxy | HTTP-Proxy | VPN |
|---|---|---|---|
| Traffic Type | Any (TCP/UDP) | Web (HTTP/HTTPS) | System-wide (All) |
| Verschlüsselung | No (Lighter & Faster) | Nein | Yes (End-to-End) |
| Geschwindigkeit | Fast (Low Overhead) | Schnell | Slowest (Due to Encryption) |
| Bester Anwendungsfall | Gaming, Scraping, P2P | Basic Web Browsing | Public Wi-Fi Security |
Basic Parameters for SOCKS5 Configuration
Before you start clicking through your settings, ensure you have the following four pieces of information from your provider:
- Server-Adresse: This is either an IP address (e.g., 192.168.1.1) or a hostname (e.g., proxy.example.com).
- Hafen-Nummer: For SOCKS5, the most common port is 1080, but your provider may assign a custom port.
- Username: Required if the proxy uses username/password authentication.
- Password: Required alongside the username.
Once you have these details ready, we can move on to the actual setup process on your specific device.
Step-by-Step: Manual SOCKS5 Configuration on Every Device
To begin using a SOCKS5 proxy, you first need to acquire high-quality IPs from a trusted provider. Free proxies are notoriously unstable and unsafe; for professional tasks, consider a provider like OkeyProxy, which offers a wide range of Wohnen, ISP, and Rechenzentrums-Proxys optimized for SOCKS5. After purchasing a subscription, your dashboard will generate the server details mentioned above.

With your credentials in hand, follow the steps below for your operating system or device.
1. SOCKS5 Configuration for Windows 11/10
Method A: Via Windows Settings (Basic / HTTP-compatible traffic only)
- Presse Gewinn + I to open Einstellungen.
- Navigieren Sie zu Netzwerk und Internet → Vollmacht.
- Unter Manuelle Proxy-Einrichtungklicken. bearbeiten.
- Umschalten auf Verwenden Sie einen Proxyserver zu Auf.
- Enter your proxy’s IP-Adresse und Hafen (e.g., 1080) in the respective fields.
- Optionally, add addresses to the “Don’t use the proxy server for these addresses” field to exclude local/intranet traffic.
- Klicken Sie auf Speichern Sie.
- Open your browser and visit whatismyip.com to verify that your IP has changed.
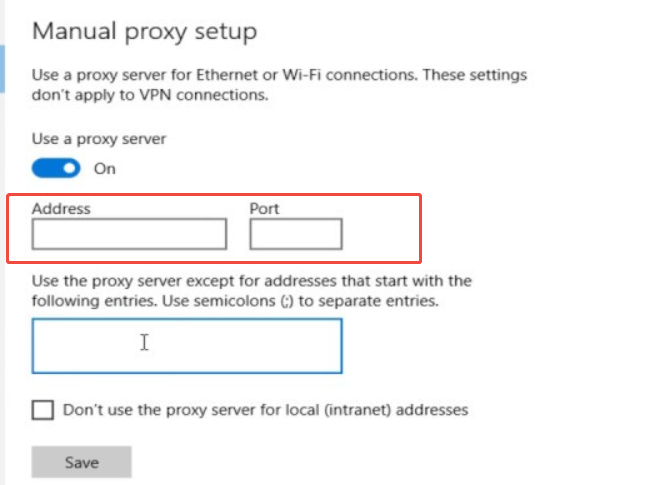
Limitation: This method uses the legacy WinINet stack, which only supports SOCKS4, not full SOCKS5. It will not handle UDP traffic or username/password authentication correctly for all applications.
Method B: Via Proxifier (Full SOCKS5 System-Wide — Recommended)
- Download and install Proxifier von der offiziellen Website.
- Open Proxifier and go to Profile → Proxy-Server.
- Klicken Sie auf Add and enter your Server address und Hafen.
- Set the protocol to SOCKS Version 5.
- If your proxy requires authentication, check Authentifizierung and enter your Benutzername und Passwort.
- Klicken Sie auf OK, then go to Profile → Proxification Rules to choose which applications route through the proxy.
- Klicken Sie auf Siehe in the proxy server dialog to test the connection before saving.
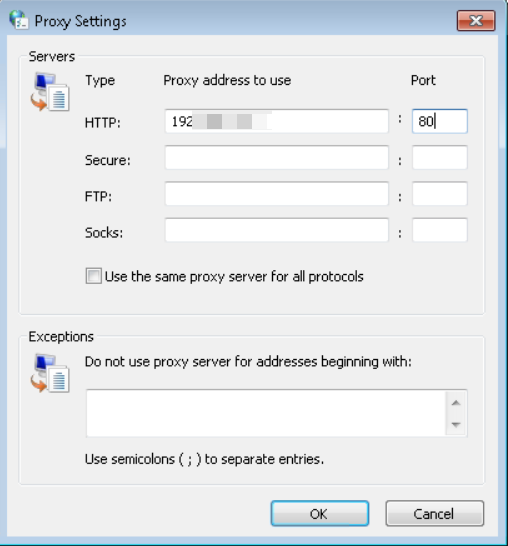
Method C: Via Internet Options (Legacy — Supports SOCKS settings per type)
- Öffnen Sie Bedienfeld → Netzwerk und Internet → Internet-Optionen.
- Gehen Sie zum Verbindungen und klicken Sie auf LAN-Einstellungen.
- Siehe Verwenden Sie einen Proxy-Server für Ihr LANund klicken Sie dann auf Fortgeschrittene.
- Clear the HTTP, Secure, and FTP fields. In the Socken field, enter your proxy’s IP address and port.
- Klicken Sie auf OK on all dialogs to save.
2. SOCKS5 Configuration for macOS (Sequoia / Sonoma)
- Klicken Sie auf die Apfel-Menü (🍎) → System-Einstellungen.
- In the left sidebar, click Netzwerk.
- Select your active connection (e.g., Wi-Fi oder Ethernet) and click Details… on the right.
- Klicken Sie auf die Vertretungen tab in the dialog that appears.
- In the protocol list on the left, find SOCKS-Proxy and toggle its switch to Auf.
- In der Server field on the right, enter your proxy’s hostname or IP address.
- Geben Sie die Hafen number (e.g., 1080) in the port field after the colon.
- If your proxy requires authentication, check “Proxy server requires password” and enter your Benutzername und Passwort.
- To exclude local network traffic, add addresses (e.g.,
*.local, 192.168.0.*) to the “Bypass proxy settings for these Hosts & Domains” field at the bottom. - Klicken Sie auf OKund klicken Sie dann auf Bewerbung um die Einstellungen zu speichern.
- Open a browser and visit whatismyip.com to confirm the IP change.
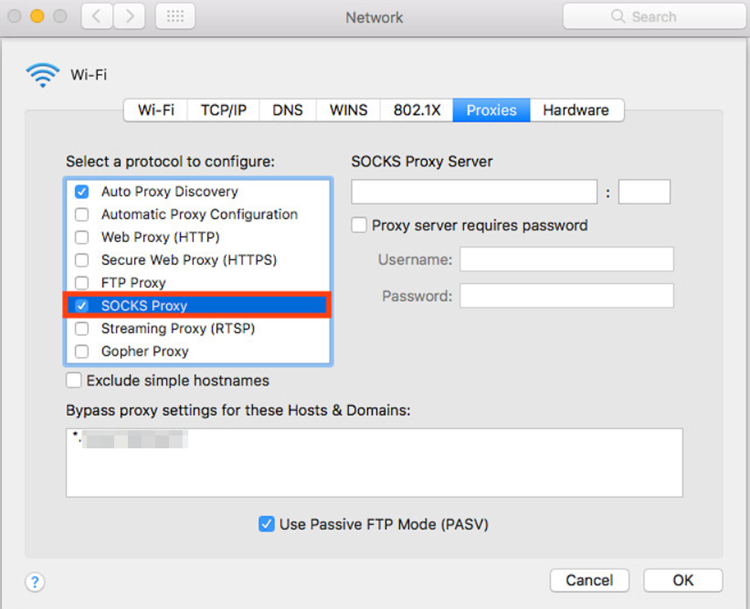
Note: Safari, Chrome, and Edge on macOS all inherit these system-level proxy settings automatically. Firefox uses its own proxy settings and must be configured separately (see the browser section below).
3. SOCKS5 Configuration for Linux
Method A: Via GNOME Desktop (GUI)
- Öffnen Sie Einstellungen → Netzwerk.
- Click the gear icon next to your active network connection.
- Gehen Sie zum Vollmacht tab.
- Set the method to Handbuch.
- Enter your SOCKS5 proxy address and port in the Socks Host field.
- Klicken Sie auf Bewerbung.
Method B: Via Environment Variables (Terminal — Per-session)
Add the following line to your ~/.bashrc oder ~/.zshrc file for persistent configuration:
export ALL_PROXY="socks5://username:password@yourproxyip:port"export all_proxy="socks5://username:password@yourproxyip:port"
Then reload the file by running source ~/.bashrc. Note that this only affects applications that respect the ALL_PROXY environment variable.
Method C: Via ProxyChains (Force Any Application Through SOCKS5)
- Install ProxyChains:
sudo apt install proxychains4(Debian/Ubuntu) orsudo yum install proxychains(RHEL/CentOS). - Edit the configuration file:
sudo nano /etc/proxychains4.conf - At the bottom of the file, comment out any existing proxy lines and add:
socks5 yourproxyip port username password - Save the file and run any application through the proxy by prefixing it with
proxychains4:proxychains4 firefox
Method D: SSH Dynamic Tunneling (Create a Local SOCKS5 Proxy)
If you have SSH access to a remote server, you can create a local SOCKS5 proxy with a single command:
ssh -D 1080 -q -C -N [email protected]
This opens a local SOCKS5 proxy on 127.0.0.1:1080 that you can then configure in any application.
4. SOCKS5 Configuration for Browsers (Chrome, Edge, Firefox)
Firefox (Built-in Native SOCKS5 Support — All Platforms)
Firefox is unique in that it has its own network settings, independent of the operating system. This makes it the most straightforward browser for SOCKS5 configuration on any platform.
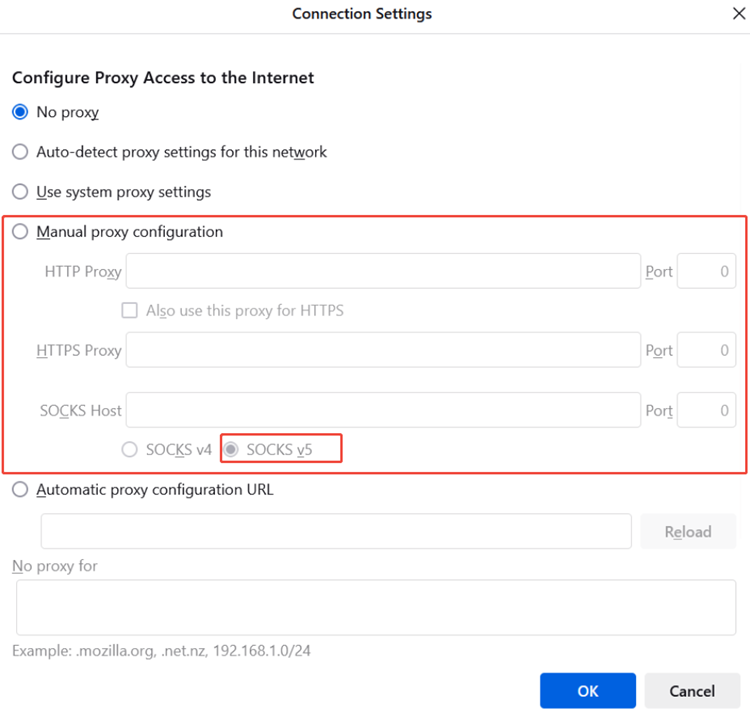
- Open Firefox and click the menu button (☰) → Einstellungen.
- In der Allgemein tab, scroll to the very bottom to find Netzwerk-Einstellungen.
- Klicken Sie auf Einstellungen....
- Wählen Sie Manuelle Proxy-Konfiguration.
- Leave the HTTP-Proxy und HTTPS-Proxy fields empty.
- In der SOCKS-Host field, enter your proxy’s IP address or hostname.
- Geben Sie die Hafen number in the field to the right.
- Wählen Sie SOCKS v5 (not v4).
- Critically: Check the box for “Proxy DNS when using SOCKS v5” to prevent DNS leaks and ensure full anonymity.
- Klicken Sie auf OK zu speichern.
- If your proxy requires authentication, Firefox will automatically prompt you to enter your Benutzername und Passwort when you first load a website.
Google Chrome & Microsoft Edge (via ZeroOmega Extension)
Chrome and Edge do not have built-in per-browser SOCKS5 configuration — they rely on OS-level proxy settings by default. For browser-only SOCKS5 without affecting the entire system, use the ZeroOmega extension (the Manifest V3-compliant successor to the popular SwitchyOmega).
- Öffnen Sie die Chrome Web Store (or Edge Add-ons store) and search for ZeroOmega.
- Klicken Sie auf Add to Chrome (oder Siehe for Edge) to install it.
- After installation, click the ZeroOmega icon in the toolbar and select Optionen.
- In the left panel, click the “+” icon to create a new Proxy Profile.
- Name the profile (e.g., “OkeyProxy”) and select Proxy Profile as the type.
- Set the Protokoll zu SOCKS5.
- Geben Sie die Server address and Hafen.
- Klicken Sie auf Apply changes.
- Click the ZeroOmega icon and select your new profile name to activate it.
- Besuchen Sie whatismyip.com to confirm the browser is now using the proxy IP.
Note: Chrome and Edge do not natively support SOCKS5 proxy authentication via extensions. If your proxy requires a username and password, the browser will display a login prompt when you first connect.
5. SOCKS5 Configuration for Mobile (iOS & Android)
iOS (iPhone / iPad)
iOS’s native proxy settings only support HTTP proxies, not SOCKS5. The Wi-Fi proxy field in iOS Settings does not accept SOCKS5 protocol connections. For true SOCKS5 on iOS, a third-party app is required.
Recommended Method: Using Shadowrocket (Paid App)
- Purchase and install Schattenrakete from the App Store.
- Open the app and tap the “+” button to add a new server.
- Set the Typ zu SOCKS5.
- Geben Sie die Gastgeber (your proxy IP or hostname), Hafen, Benutzernameund Passwort.
- Tippen Sie auf . Done to save the configuration.
- Back on the main screen, tap the toggle next to your proxy entry to connect.
- iOS will ask you to allow the app to add a VPN configuration — tap Erlauben Sie and authenticate with Face ID / Touch ID.
Alternative free apps: Potatso Lite or Quantumult (basic version) also support SOCKS5 on iOS.
Android
Android supports manual proxy configuration within individual Wi-Fi network settings, but this applies only to that specific Wi-Fi connection and may not cover all app traffic (especially apps using direct sockets).
Method A: Built-in Wi-Fi Settings (Per-network, limited coverage)
- Öffnen Sie Einstellungen → Verbindungen (oder Netzwerk und Internet) → Wi-Fi.
- Tippen Sie auf die Zahnrad-Symbol (or long-press) next to your connected network.
- Tippen Sie auf . View more oder Erweiterte Optionen (this varies by Android version and manufacturer).
- Tippen Sie auf die Vollmacht dropdown and change it from Keine zu Handbuch.
- Geben Sie die Proxy hostname (your SOCKS5 server address) and Proxy-Anschluss (e.g., 1080).
- Tippen Sie auf . Speichern Sie.
Limitation: Android’s built-in proxy settings at the Wi-Fi level have inconsistent SOCKS5 support across manufacturers. Many apps (especially those using their own network stacks) will ignore these settings.
Method B: Using ProxyDroid App (System-wide, requires root)
- Installieren Sie ProxyDroid from the Google Play Store (requires a rooted device).
- Open ProxyDroid and enter the Gastgeber, Hafen, and set Proxy-Typ zu SOCKS5.
- If required, enter your Benutzername und Passwort.
- Umschalten auf Auto-connect on and tap the main switch to enable the proxy.
Method C: Using a VPN-based Proxy App (No Root Required — Recommended)
Apps like v2rayNG oder NekoBox can wrap your SOCKS5 proxy within a local VPN tunnel, providing system-wide coverage without root access. Configure the SOCKS5 details within the app’s server settings and enable the VPN profile when prompted by Android.
Advanced SOCKS5 Configuration Options
Once you have the basic connection working, you can fine-tune your setup for better security and performance.
Authentication: Username and Password
While some proxies use IP Whitelisting (where access is granted based on your current IP address), most professional SOCKS5 setups require a username and password — known as “User:Pass Authentication.” Always double-check these credentials; a single typo will result in a “407 Proxy Authentication Required” error. When copying credentials from your provider’s dashboard, watch out for accidental leading or trailing spaces.
DNS Leaks: The Silent Privacy Killer
Even with your IP masked, your browser may still send DNS requests through your regular ISP — a vulnerability known as a “DNS leak.” In your SOCKS5 configuration (especially in Firefox or ZeroOmega), always enable the option to "Proxy DNS bei Verwendung von SOCKS v5". This ensures that the proxy server handles all DNS lookups, keeping your browsing activity truly private. You can verify this by visiting dnsleaktest.com after configuring your proxy.
Validation: Did the IP Actually Change?
After configuring your proxy, always verify the result. Visit a site like whatismyip.com oder ipleak.net. If the IP address and location shown match your proxy’s details — and not your real physical location — your SOCKS5 configuration is working correctly.
Common Use Cases for SOCKS5 Proxies
Why do people go through the trouble of SOCKS5 configuration? Because it unlocks capabilities that standard internet connections cannot provide.
- Social Media Management:Manage multiple accounts on Instagram, TikTok, or Facebook without triggering “suspicious activity” flags. SOCKS5 provides unique, clean residential IPs that appear as genuine user traffic.
- SEO and Web Scraping: Collect large volumes of data from Google or e-commerce sites. Using a rotating SOCKS5 configuration lets you bypass rate limits and anti-scraping mechanisms.
- Anzeigenüberprüfung: View your ads exactly as they appear to users in other countries to ensure they are not being hijacked by fraudsters or displayed incorrectly.
- Streaming und Spiele: Because SOCKS5 supports UDP, it is the best proxy choice for gamers looking to reduce latency or access region-locked game servers.
- Überwachung des elektronischen Geschäftsverkehrs: Track prices and inventory across global markets anonymously to stay ahead of the competition.
Troubleshooting SOCKS5 Configuration Issues
Sometimes, even with the correct settings, things go wrong. Here is how to resolve the most common issues:
- Credential Errors (407 Authentication Required): Ensure there are no extra spaces when you copy-paste your username or password. Check your provider’s dashboard to confirm the credentials are still active and have not expired.
- “Proxy Server is Not Responding”: This usually means the port is blocked by your local firewall, or the proxy server itself is offline. Try switching to a different IP or port from your provider’s pool, and check that your local firewall is not blocking outbound traffic on port 1080.
- DNS Leaks (Real location showing): If your real IP or location appears on a leak test, ensure “Proxy DNS when using SOCKS v5” (or “Remote DNS”) is enabled in your configuration tool. This is the most common cause of failed anonymity.
- Connection Drops (Residential Proxies): If you are using residential proxies, the IP may have gone offline, as these belong to real home users with dynamic connections. Simply refresh your proxy list to obtain a new sticky or rotating IP from your provider’s dashboard.
- IP Whitelist Issues: If you are using IP-based authentication instead of username/password, ensure your current local IP address is correctly added to your provider’s whitelist. Your local IP changes every time you reconnect to the internet on most home connections.
- Application Ignoring Proxy Settings: Some applications use their own network stack and bypass OS-level proxy settings entirely. In this case, use a proxifier tool (Proxifier on Windows/macOS, ProxyChains on Linux) to force the application’s traffic through the SOCKS5 tunnel.
Schlussfolgerung
Mastering SOCKS5 configuration is the key to unlocking the full potential of the web, whether for business or personal privacy. While the manual setup varies by device and platform, the core principles remain consistent: use high-quality IP sources, configure the correct port, enable DNS-over-proxy to prevent leaks, and always verify your IP after setup. By choosing a reliable provider like OkeyProxy and following the accurate, platform-specific steps outlined in this guide, you can ensure a fast, stable, and truly anonymous connection for any task in 2026.