
Want to bypass internet restrictions? 🔓 Want to protect your online privacy? 🛡️ V2RayNG is one of the most trusted tools for the job. This guide walks you through everything: installing the app, adding a server, connecting, fine-tuning advanced settings, and fixing common problems. Let’s dive in. 👇
What Is V2RayNG? 📱
V2RayNG is a free, open-source client app for Android. It’s built on the powerful V2Ray / Xray core. It helps users bypass internet censorship and strengthen privacy using the VMess protocol and several others. The interface is simple. The setup is fast. That’s why it remains a top choice for users in regions with heavy internet restrictions. Its flexibility is a big reason for its popularity too — it supports many protocols and can be tuned for very specific needs.
- 🟢 User-Friendly Interface: Clean design, easy even for first-time users.
- 🟢 Multi-Protocol Support: Works with VMess, VLESS, Shadowsocks, Trojan, SOCKS5, and WireGuard.
- 🟢 Customizable Settings: Tweak routing, DNS, and traffic rules to fit your needs.
- 🟢 Fast Configuration: Import servers instantly via QR code, clipboard, or file.
- 🟢 Open Source: Fully auditable code, actively maintained on GitHub.
How to Download and Install V2RayNG 📥
Getting started only takes a couple of minutes. Here’s how:
- Download the APK: Go to the official V2RayNG GitHub releases page and grab the latest APK. New users should pick the version marked “Latest” for the most stable experience. ⚠️ Avoid third-party download sites — malicious clones do exist.
- Enable Unknown Sources: Android blocks installs from outside the Play Store by default. Go to Settings > Security > Unknown Sources (or “Install unknown apps” on newer Android versions) and allow it for your browser or file manager.
- Install the App: Open the downloaded APK file and tap through the install prompts. Done! ✅
Initial Setup: Grant Permissions 🔑
Once installed, open V2RayNG. It will ask for network and VPN permissions on first launch. Allow them — the app can’t route your traffic without these permissions.
How to Add a Server Configuration ⚙️
V2RayNG can’t do anything without a server. Adding one is quick, and there are several ways to do it depending on what your provider gives you.
1. Scan a QR Code 📷
Tap the “+” icon in the top-right corner, then choose “Scan QR Code.” Point your camera at the code from your provider. Settings import automatically. No typing needed.
2. Import from Clipboard 📋
Copy your server link (it usually starts with vmess://, vless://, trojan://, or ss://). Then tap “+” > “Import Config from Clipboard.” V2RayNG reads the link and fills in everything for you.
3. Manual Setup, Protocol by Protocol 🛠️
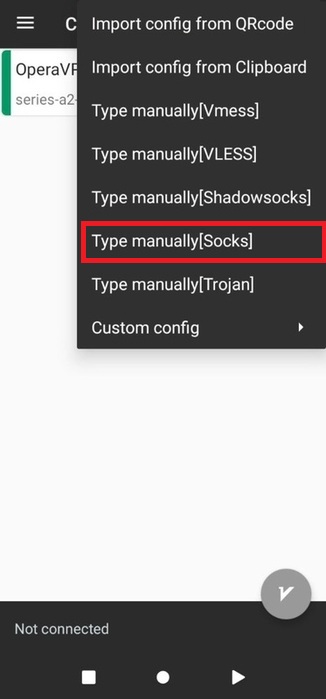
If your provider only gave you raw credentials, add them manually. Tap “+” > “Type Manually,” then pick your protocol:
- VMess: Enter the server address, port, UUID, Alter ID, and an encryption method like
aes-128-gcmorchacha20-poly1305. - VLESS: Enter the address, port, UUID, and flow control (e.g.
xtls-rprx-visionfor XTLS setups). Set encryption tonone— VLESS relies on the transport layer for security. - Shadowsocks: Enter the server address, port, and an encryption method such as
aes-256-gcm. - SOCKS5: Enter the proxy address and port. Add a username and password if your proxy requires authentication.
- Trojan: Enter the address, port, and password. Trojan traffic disguises itself as normal HTTPS, which helps it slip past strict firewalls.
- WireGuard: Enter the endpoint, your private key, the peer’s public key, and the local IP address assigned by your provider.
4. Custom Configuration (JSON) 📄
Have a full JSON config file? Tap the three-dot menu in the top-right corner and select “Import from File” to upload it directly. This is common for self-hosted servers with custom routing rules.
5. Subscription Links (Multiple Servers at Once) 🔄
Many providers give you a single subscription URL that contains dozens of servers. Open the left-side menu and add a subscription group, or tap “+” > “Import Config from URL.” Once added, tap the three-dot menu and choose “Update Subscription” to pull in every available server in one go.
How to Test and Connect to a Server 🔌
Now that a server (or a list of servers) is added, it’s time to connect.
- Test Latency First: Tap the floating test icon, or use the three-dot menu and select “Real Ping — Test All Configs.” This shows you which server responds fastest. Lower latency = smoother browsing. ⚡
- Pick a Server: Tap your preferred server until a green indicator appears next to it.
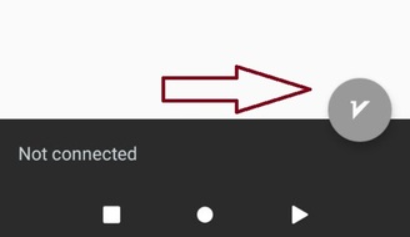
- Connect: Tap the round “V” button in the bottom-right corner. Accept the Android VPN connection prompt if it appears. The icon turns green once you’re connected. 🟢
- Monitor Your Connection: The main screen shows live upload/download speed and total data usage.
- Disconnect: Tap the same “V” button, or toggle the switch off, to end the session.
Advanced Settings for Power Users 🧩
Once the basics work, V2RayNG offers a lot more control.
1. Fine-Tune Protocol Settings
VMess
UUID: Your unique user ID. Alter ID: Adds an extra layer of obfuscation (many modern servers set this to 0). Encryption: Pick aes-128-gcm or chacha20-poly1305 to secure your data.
Shadowsocks
Server Address & Port: As given by your provider. Encryption: aes-256-gcm is a solid, widely supported choice.
SOCKS5
Proxy Address: IP and port of the proxy. Authentication: Username and password, if required.
2. Set Up Routing Rules 🗺️
Routing rules decide which traffic goes through the proxy and which doesn’t.
- IP Rules: Route traffic based on IP address — useful for sending specific services through specific servers.
- Domain Rules: Route traffic by domain name, so certain sites always use the proxy (or bypass it).
- Priority: Order your rules carefully — higher-priority rules apply first.
- Exceptions: Exclude local or trusted traffic from the proxy entirely.
3. Strengthen Security 🔒
Always keep encryption enabled. Consider enabling obfuscation (like TLS or REALITY on the server side) to make your traffic look like ordinary HTTPS — this makes it much harder for network filters to detect and block.
Need a Proxy IP to Pair with V2RayNG? 🌍
V2RayNG supports SOCKS5 as one of its built-in protocols (see the manual setup section above). If you don’t have a SOCKS5 endpoint yet, OkeyProxy provides HTTP(S) & SOCKS5 proxy IPs with a large, rotating IP pool — just drop the address, port, and credentials into V2RayNG’s SOCKS5 config. New users can currently claim a 1GB free trial proxy to test the setup before committing. 🎁
Troubleshooting V2RayNG 🧯
Connection Problems
- Verify Settings: Double-check the server address, port, and credentials. If the config came from a file or URL, try re-importing it or requesting a fresh one from your provider.
- Network Issues: Make sure your internet connection is stable, and that no firewall or antivirus app is blocking V2RayNG.
- DNS Issues: Set a custom DNS in the app settings. Google DNS (8.8.8.8) or Cloudflare DNS (1.1.1.1) usually resolves DNS-related failures.
- Connected but No Internet: This is often a clock issue. Go to Settings > System > Date & Time and enable automatic time and time zone. A wrong system time can break TLS handshakes entirely. ⏰ If that doesn’t fix it, try a different server with normal latency.
Performance Issues
- Check the Logs: Open the app’s settings and view the logs. They usually point straight to the error.
- Pick a Better Server: Choose one with lower latency for a smoother connection. If it’s unstable, try switching transport protocols — WebSocket, TCP, or mKCP.
- Optimize Settings: Adjust buffer size or connection type if speeds feel inconsistent.
App Errors
- Clear App Cache: In your device settings, find V2RayNG, then clear its cache and data. Reconfigure afterward.
- Update the App: Always run the latest version for the newest fixes and features.
- Reinstall: Still stuck? Uninstall and reinstall the app as a last resort.
Subscription Update Fails
Double-check the subscription URL for typos or missing characters. If it still fails, try turning your active proxy off, updating the subscription, then reconnecting — some providers block subscription updates while a proxy is active.
FAQ About V2RayNG ❓
Is V2RayNG free?
Yes. V2RayNG itself is completely free and open-source for Android. That said, using it effectively requires a server, and quality servers are often paid. Some users choose to self-host a V2Ray server instead, which comes with its own hosting costs.
Is V2Ray a proxy or a VPN?
V2Ray is a flexible network proxy tool, not a traditional VPN. A VPN builds one encrypted tunnel and routes all traffic through it. V2Ray, by contrast, forwards traffic through a remote server and is specifically designed to obfuscate and disguise that traffic — making it much better suited to bypassing censorship and DPI detection than a standard VPN.
Does V2RayNG support HTTP(S) or SOCKS proxies?
Yes — both. Configure them under “Manual Configuration,” or import a config file that already specifies proxy settings. Need a reliable HTTP(S) or SOCKS5 proxy IP to plug in? OkeyProxy currently offers a 1GB trial proxy for new users, which is a solid starting point. 🎯
How do I use Shadowsocks with V2RayNG?
Set up V2RayNG as a Shadowsocks client. First, gather your Shadowsocks server details. Then add a server manually and select “Shadowsocks” as the protocol — or simply import the configuration file or link directly.
How do I run V2Ray on Windows?
V2RayNG itself is Android-only, but the underlying V2Ray core runs fine on Windows:
- Visit the V2Ray GitHub Releases page and download the Windows build.
- Extract the ZIP file, then create or edit
config.jsonin that folder with your server details:{ "inbounds": [ { "port": 1080, "listen": "127.0.0.1", "protocol": "socks", "settings": { "auth": "noauth", "udp": true } } ], "outbounds": [ { "protocol": "vmess", "settings": { "vnext": [ { "address": "your_server_address", "port": your_server_port, "users": [ { "id": "your_uuid", "alterId": 0, "security": "aes-128-gcm" } ] } ] } } ] } - Open Command Prompt or PowerShell, navigate to the V2Ray folder, and run
v2ray.exe -config config.json. - Point your system or browser proxy settings to
localhoston the port set in your config.
How do I install V2Ray on Linux?
Like Windows, Linux doesn’t get a V2RayNG app — but the V2Ray core works directly:
- Create a directory, download the latest release from the V2Ray GitHub page, and extract it.
- Move the v2ray and v2ctl binaries to /usr/local/bin, then create a config file at /etc/v2ray/config.json.
- Start V2Ray from the terminal.
Is it safe to use V2RayNG?
Generally, yes — as long as you download it from official sources and configure it properly. You can also explore some V2RayNG alternatives for other platforms. To stay safe: use strong encryption, keep the app updated, and only connect to servers you actually trust. Review app permissions carefully, and handle your config files and credentials with care. 🔐
Conclusion 🎉
V2RayNG is a powerful, flexible app for managing your V2Ray connections — and once it’s set up, day-to-day use is genuinely simple. This guide should cover installation, configuration, connection, and troubleshooting from start to finish. For more updates and the latest releases, check the official V2RayNG GitHub page. And if you still need a dependable HTTP(S) or SOCKS5 proxy IP to plug into it, OkeyProxy’s 1GB free trial is a low-risk way to get started. Happy (and safe) browsing! 🌐✨