Wenn Sie ein Android-Telefon zum Surfen, Testen von Apps, Verwalten von Konten oder für den Zugriff auf eingeschränkte Inhalte verwenden, kann die Einrichtung eines Proxys äußerst nützlich sein. Ein Proxy ermöglicht es Ihrem Gerät, den Datenverkehr über einen anderen Server zu leiten. So können Sie Ihre IP-Adresse ändern, Netzwerkbeschränkungen umgehen oder den Datenschutz verbessern.
Die gute Nachricht ist, dass Android von Haus aus Proxy-Einstellungen unterstützt. Das Problem dabei? Viele Benutzer wissen nicht, wo sie diese Einstellungen finden oder wie sie sie richtig konfigurieren. Dieser Leitfaden führt Sie Schritt für Schritt durch alle praktischen Möglichkeiten zum Einrichten eines Proxys in Android.
Was ist ein Android-Proxyserver?
Ein Proxyserver fungiert als Vermittler zwischen Ihrem Android-Gerät und dem Internet. Anstatt sich direkt mit einer Website oder App zu verbinden, wird Ihre Anfrage zunächst an den Proxyserver gesendet, der sie dann an das Ziel weiterleitet.
Wie Proxys unter Android funktionieren
- Ihre echte IP-Adresse ist verborgen
- Die Website sieht stattdessen die IP des Proxys
- Die Weiterleitung des Datenverkehrs hängt davon ab, wie der Proxy konfiguriert ist (Wi-Fi, Browser oder App-Ebene)
Proxy vs. VPN
Vollmacht: Betrifft in der Regel bestimmte Anwendungen, Browser oder Netzwerke; leicht und flexibel
VPN: Verschlüsselt den gesamten Datenverkehr des Geräts; stärkerer Datenschutz, aber höherer Akkuverbrauch und höhere Geschwindigkeit
Für viele Android-Nutzer sind Proxys ideal, wenn sie IP-Kontrolle ohne vollen VPN-Overhead benötigen.
Proxy in Android einstellen (Schritt-für-Schritt)
Android bietet mehrere Möglichkeiten, einen Proxy zu konfigurieren, je nach Ihrem Anwendungsfall. Nachfolgend finden Sie die zuverlässigsten Methoden.
🔶 Methode 1: Proxy über Wi-Fi einstellen (am häufigsten)
Das Einrichten eines Proxys über Wi-Fi ist die einfachste und am häufigsten verwendete Methode unter Android. Dieser Ansatz funktioniert gut bei Browsern und einigen Apps und erfordert keine Installation von Drittanbieter-Software.
Schritt 1: Android-Einstellungen öffnen
Gehen Sie auf Ihrem Android-Gerät zu Einstellungen und tippen Sie dann auf Netzwerk und Internet > Internet (auf manchen Geräten kann dies als Wi-Fi).
Schritt 2: Wählen Sie Ihr verbundenes Wi-Fi-Netzwerk
Suchen Sie das Wi-Fi-Netzwerk, mit dem Sie derzeit verbunden sind, und tippen Sie auf die Schaltfläche Zahnrad-Symbol (⚙️) oder Symbol bearbeiten (✏️) daneben, um die Netzwerkdetails zu öffnen.
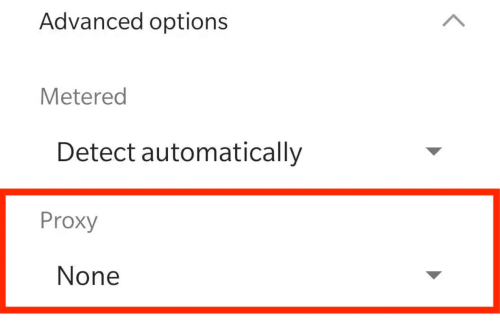
Schritt 3: Zugriff auf erweiterte Optionen
Tippen Sie auf . bearbeiten (in der Regel in der oberen rechten Ecke) und erweitern Sie dann die erweiterten Optionen, um weitere Netzwerkeinstellungen anzuzeigen.
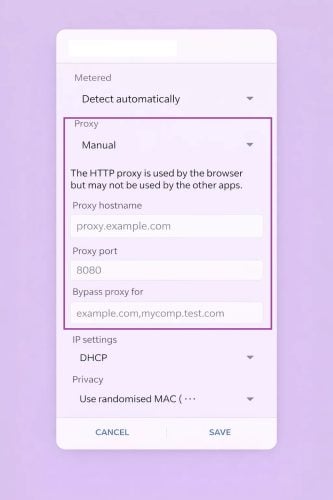
Schritt 4: Proxy-Einstellungen auf manuell ändern
Schalten Sie unter dem Abschnitt Proxy die Option von None auf Handbuch.
Schritt 5: Proxy-Server-Details eingeben
Füllen Sie die folgenden, von Ihrem Bevollmächtigungsdienst bereitgestellten Informationen aus:
- Proxy-Hostname (oder IP-Adresse)
- Proxy-Anschluss
⚠️ Hinweis: Die Wi-Fi-Proxy-Einstellungen von Android unterstützen nur HTTP(S)-Proxys. Für SOCKS5-Proxys sind in der Regel Anwendungen von Drittanbietern erforderlich.
Schritt 6: Authentifizierung (falls erforderlich)
Wenn Ihr Proxy eine Authentifizierung erfordert, fordert Android Sie auf, wenn Sie einen Browser öffnen. Geben Sie den Proxy ein Benutzernamen und Passwort (nicht Ihre Anmeldedaten für das Konto).
Schritt 7: Konfigurieren der Umgehungsliste (optional)
Verwenden Sie die "Umgehungsproxy für" um Websites hinzuzufügen, die direkt ohne Verwendung des Proxys verbunden werden sollen.
Trennen Sie mehrere Domains durch Kommas.
Schritt 8: Speichern und Testen der Verbindung
Tippen Sie auf . Speichern Sieöffnen Sie dann einen Browser und besuchen Sie eine beliebige Website, um zu überprüfen, ob die Proxy-Verbindung funktioniert.
Sobald dies abgeschlossen ist, leitet Ihr Android-Gerät den Datenverkehr von diesem Wi-Fi-Netzwerk über den Proxyserver. Denken Sie daran, dass:
- Der Proxy gilt nur für das aktuelle Wi-Fi-Netzwerk
- Sie müssen es neu konfigurieren, wenn Sie eine Verbindung zu einem anderen Wi-Fi
- Einige Anwendungen ignorieren die Proxy-Einstellungen des Systems absichtlich
⚠️ Die Verfügbarkeit hängt von Ihrem Anbieter und Ihrer Android-Version ab.
🔶 Methode 2: Proxy über das Mobilfunknetz einstellen (APN-Einstellungen)
Wenn Sie einen Proxy über die APN-Einstellungen (Access Point Name) konfigurieren, kann Ihr Android-Gerät einen Proxy verwenden, während es mit mobilen Daten statt mit WLAN verbunden ist. Diese Methode ist nützlich, wenn Wi-Fi-Proxys nicht verfügbar sind, aber sie bringt einige Einschränkungen mit sich.
Schritt 1: Android-Einstellungen öffnen
Gehe zu Einstellungenund navigieren Sie dann zu Netzwerk und Internet > Internet.
Schritt 2: Zugriff auf die Einstellungen des mobilen Netzwerks
Tippen Sie auf Ihren Mobilfunkanbieter (SIM-Karte), blättern Sie nach unten und wählen Sie Namen der Zugangspunkte (APNs).
Auf einigen Geräten kann dies unter Erweiterte Einstellungen.
Schritt 3: Bearbeiten Sie den aktiven APN
Wählen Sie den derzeit verwendeten APN. Daraufhin wird der Bildschirm zur Bearbeitung der Konfiguration geöffnet.
Schritt 4: Proxy-Details eingeben
Suchen Sie die folgenden Felder und geben Sie die von Ihrem Proxy-Dienst bereitgestellten Informationen ein:
- Proxy (Hostname oder IP-Adresse)
- Hafen
- Benutzername (falls erforderlich)
- Passwort (falls erforderlich)
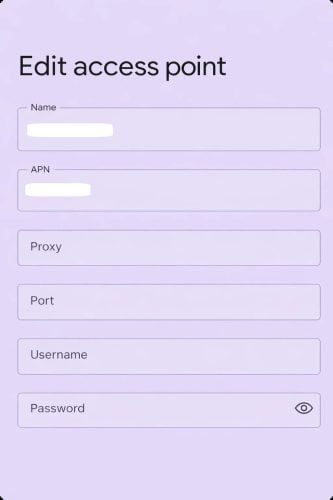
⚠️ Hinweis: Über APN konfigurierte Proxys unterstützen nur HTTP(S)-Verbindungen. SOCKS5-Proxys werden auf der System-APN-Ebene nicht unterstützt.
Schritt 5: Speichern der Konfiguration
Tippen Sie auf das Drei-Punkte-Menü (⋮) in der oberen rechten Ecke und wählen Sie Speichern Sie.
Schritt 6: Mobile Daten neu starten
Schalten Sie Ihre mobilen Daten aus und wieder ein, oder aktivieren Sie kurz den Flugzeugmodus, um die neuen Proxy-Einstellungen zu übernehmen.
Schritt 7: Überprüfen Sie die Verbindung
Öffnen Sie einen Webbrowser. Wenn Sie dazu aufgefordert werden, geben Sie Ihre Anmeldedaten für die Proxy-Authentifizierung ein und bestätigen Sie die Verbindung.
Danach wird Ihr mobiler Datenverkehr über den konfigurierten Proxyserver geleitet. Bitte beachten Sie:
- APN-Proxy-Einstellungen gelten nur für mobile Daten, nicht für Wi-Fi
- Nicht alle Anwendungen beachten die APN-Proxy-Regeln
- Falsche APN-Bearbeitungen können die mobile Konnektivität vorübergehend unterbrechen
Wenn Sie Verbindungsprobleme haben, überprüfen Sie Ihre APN-Details oder stellen Sie den Standard-APN Ihres Anbieters wieder her.
🔶 Methode 3: Proxy in einem Android-Browser einstellen
Einige Android-Browser unterstützen integrierte Proxy-Einstellungen, mit denen Sie den Browserverkehr nur über einen Proxy-Server leiten können. Dies ist eine einfache Option, wenn Sie keine systemweite Proxy-Abdeckung benötigen.
⚠️ Diese Methode betrifft nur den Browser, nicht andere Anwendungen auf Ihrem Gerät.
Schritt 1: Öffnen Sie einen Proxy-unterstützten Browser
Browser wie Firefox für Android, Kiwi Browser oder bestimmte Chromium-basierte Browser ermöglichen eine manuelle Proxy-Konfiguration.
Schritt 2: Zugriff auf die Netzwerkeinstellungen des Browsers
Öffnen Sie die Einstellungen des Browsers und navigieren Sie zu Netzwerk, Verbindung oder Erweiterte Einstellungen (die Menünamen variieren je nach Browser).
Schritt 3: Aktivieren der manuellen Proxy-Konfiguration
Wählen Sie Manueller Proxy oder Benutzerdefinierter Proxy, und wählen Sie dann den Proxy-Typ:
- HTTP/HTTPS
- SOCKS5 (wird von einigen Browsern, wie Firefox, unterstützt)
Schritt 4: Proxy-Details eingeben
Geben Sie den Proxy-Host/IP, den Port und - falls erforderlich - Ihren Benutzernamen und Ihr Passwort ein.
Schritt 5: Testen Sie die Verbindung
Öffnen Sie eine Website, um Ihre IP-Änderung zu überprüfen, oder authentifizieren Sie den Proxy, wenn Sie dazu aufgefordert werden.
Wann diese Methode am besten funktioniert
- Surfen auf geografisch eingeschränkten Websites
- Proxys schnell testen
- Geringes Gewicht, keine Systemänderungen
Beschränkungen
- Andere Anwendungen ignorieren die Proxy-Einstellungen des Browsers
- Nicht geeignet für Automatisierung oder Verkehr auf Anwendungsebene
Methode 4: Verwendung einer Proxy-App eines Drittanbieters (empfohlen für Fortgeschrittene)
Wenn Sie Proxy-Unterstützung für Apps, SOCKS5-Verbindungen oder häufige IP-Wechsel benötigen, ist eine spezielle Android-Proxy-App die zuverlässigste Lösung.
Diese Anwendungen fungieren als lokaler Proxy-Client und leiten den Datenverkehr von ausgewählten Anwendungen - oder allen Anwendungen - über Ihren Proxy-Server.
Schritt 1: Installieren Sie eine Proxy-App
Laden Sie einen vertrauenswürdigen Proxy-Client von Google Play herunter, z. B.:
- Super Proxy
- ProxyDroid
- Shadowrocket (Verfügbarkeit kann je nach Region variieren)
Schritt 2: Proxyserver-Details hinzufügen
Öffnen Sie die App und erstellen Sie ein neues Proxy-Profil. Eingabe:
- Proxy-Typ (HTTP(S) oder SOCKS5)
- Host/IP und Anschluss
- Authentifizierungsnachweise (falls erforderlich)
Schritt 3: Wählen Sie Apps oder Systemmodus
Je nach App können Sie das:
- Bestimmte Anwendungen über den Proxy leiten
- Aktivieren Sie den globalen Proxymodus (erfordert möglicherweise den VPN-Modus oder Root-Zugriff)
Schritt 4: Verbinden und Überprüfen
Aktivieren Sie den Proxy und testen Sie die Konnektivität mit einem Browser oder einem IP-Check-Tool.
Warum diese Methode empfohlen wird
- Funktioniert mit mobilen Anwendungen, nicht nur mit Browsern
- Unterstützt SOCKS5, Rotationen und Authentifizierung
- Bessere Stabilität für lange Sitzungen
Zu beachtende Dinge
- Einige Anwendungen benötigen eine VPN-Erlaubnis, um zu funktionieren
- Vollständiges System-Routing erfordert möglicherweise Root-Zugriff
- Die Qualität des Proxys wirkt sich direkt auf die Leistung aus
Extra: Proxy auf Android verwenden und deaktivieren
Sobald ein Proxy auf Ihrem Android-Gerät ordnungsgemäß konfiguriert ist, wird Ihr Internetverkehr über den Proxy-Server geleitet, anstatt sich direkt mit Websites zu verbinden. Auf diese Weise können Sie Ihre IP-Adresse ändern, Beschränkungen umgehen oder eine zusätzliche Ebene der Privatsphäre hinzufügen. Es ist jedoch wichtig zu verstehen, wie Android-Proxys in der Praxis funktionieren und wo ihre Grenzen liegen.
Wie man einen Proxy auf Android verwendet
Wenn Sie einen Proxy über die Systemeinstellungen von Android einstellen (in der Regel über Wi-Fi), gilt der Proxy nur für das spezifische Wi-Fi-Netzwerk, in dem er konfiguriert wurde. Wenn Sie zu einem anderen Wi-Fi-Netzwerk wechseln, müssen Sie den Proxy für dieses Netzwerk erneut einstellen. Außerdem funktionieren Proxy-Einstellungen auf Systemebene standardmäßig nicht für mobile Daten (Mobilfunknetze).
Eine weitere wichtige Einschränkung ist die Kompatibilität von Apps. Während Android-Browser in der Regel die Proxy-Einstellungen des Systems respektieren, können viele Apps diese vollständig ignorieren, je nachdem, wie die App entwickelt wurde. Folglich sind Proxys, die auf Systemebene konfiguriert sind, für das Surfen im Internet am zuverlässigsten, während der App-Verkehr dies erfordern kann:
- Eine spezielle Proxy-Anwendung
- Proxy-Konfiguration auf Anwendungsebene
- Erweiterte Einstellungen (wie VPN-basierte Proxy-Anwendungen oder gerootete Geräte)
Wenn Ihr Ziel darin besteht, den gesamten Datenverkehr - einschließlich der Anwendungen - über einen Proxy zu leiten, ist die Verwendung einer Proxy-App eines Drittanbieters in der Regel die praktischste Lösung für nicht verwurzelte Geräte.
Proxy auf Android deaktivieren
Das Deaktivieren eines Proxys unter Android ist einfach und erfolgt auf demselben Weg wie das Einrichten des Proxys.
Gehen Sie zurück zu dem Wi-Fi-Netzwerk, in dem der Proxy konfiguriert wurde, öffnen Sie die erweiterten Einstellungen und suchen Sie die Option Proxy. Wählen Sie im Dropdown-Menü die Option Keine und tippen Sie dann auf Speichern. Nach der Deaktivierung verbindet sich Ihr Gerät direkt mit dem Internet, ohne den Proxy zu verwenden.
Wenn Sie eine Proxy-App eines Drittanbieters verwenden, stellen Sie sicher, dass Sie den Proxy in der App selbst deaktivieren oder trennen, um das normale Netzwerkverhalten vollständig wiederherzustellen.
Häufige Probleme bei der Einstellung des Proxys in Android (und Lösungen)
Selbst bei korrekten Einrichtungsschritten können sich Android-Proxy-Konfigurationen manchmal unerwartet verhalten. Dies ist oft auf Systemeinschränkungen, Einschränkungen auf App-Ebene oder Qualitätsprobleme des Proxys zurückzuführen. Nachfolgend finden Sie die häufigsten Probleme, auf die Benutzer stoßen, und wie Sie sie effektiv beheben können.
Problem 1: Proxy verbunden, aber kein Internet
Dies geschieht in der Regel, wenn die Proxydaten falsch sind oder der Proxyserver instabil ist.
- Überprüfen Sie die Proxy-IP, den Port und die Authentifizierungsdetails
- Stellen Sie sicher, dass der Proxy das gewünschte Protokoll unterstützt (HTTP vs. SOCKS5)
- Versuchen Sie, zu einem anderen Proxy-Standort oder Server zu wechseln
Problem 2: Apps funktionieren nicht mit Proxy
Nicht alle Android-Anwendungen respektieren die Proxy-Einstellungen auf Systemebene.
- Viele Anwendungen umgehen die Wi-Fi-Proxy-Konfigurationen vollständig
- Verwenden Sie eine Proxy-Anwendung eines Drittanbieters, die Routing auf Anwendungsebene oder SOCKS5-Proxys unterstützt.
- Testen Sie den Proxy zunächst in einem Browser, um sicherzustellen, dass er funktioniert
Problem 3: Authentifizierung fehlgeschlagen
Authentifizierungsfehler sind bei privaten Proxys üblich.
- Überprüfen Sie Ihren Benutzernamen und Ihr Passwort
- Prüfen, ob IP-Whitelisting erforderlich ist
- Vermeiden Sie beim Einfügen von Anmeldedaten das Kopieren zusätzlicher Leerzeichen
Problem 4: Proxy funktioniert bei Wi-Fi, aber nicht bei mobilen Daten
Dies ist eine bekannte Android-Einschränkung.
- Android unterstützt von Haus aus keine Proxys für mobile Daten
- APN-basierte Proxy-Unterstützung hängt von Ihrem Anbieter ab
- Verwenden Sie eine spezielle Proxy-App, wenn Sie Proxy-Zugang in mobilen Netzwerken benötigen
Empfohlener Proxy für Android-Benutzer
Wenn Sie einen Proxy benötigen, der unter Android reibungslos funktioniert - insbesondere bei der Verwendung von Apps, SOCKS5-Verbindungen oder rotierenden IPs - macht die Qualität des Proxys einen echten Unterschied. Proxys von geringer Qualität führen oft zu instabilen Verbindungen, häufigen Fehlern oder dazu, dass Apps nicht richtig geladen werden.
Hochwertiges Wohnen oder ISP-Proxys sind im Allgemeinen besser für Android-Geräte geeignet, weil sie:
- Reduzierung von Verbindungsabbrüchen und Timeouts
- Vermeiden Sie Probleme mit der IP-Reputation und schwarzen Listen
- Zuverlässigere Leistung mit mobilen Anwendungen und Browsern
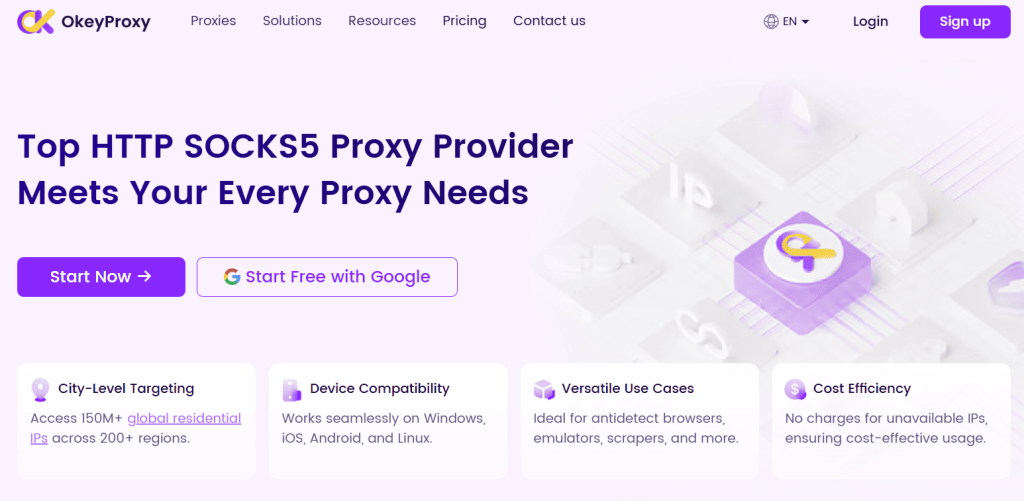
Viele Android-Nutzer bevorzugen Anbieter wie OkeyProxydie bieten:
- Unterstützung für HTTP(S) und SOCKS5-Protokolle
- Große Pools echter privater IPs
- Zielvorgaben auf Länder- und Stadtebene für eine bessere Kontrolle
- Kompatibilität mit gängigen Android-Proxy-Apps
Insgesamt trägt die Verwendung eines zuverlässigen Proxy-Dienstes dazu bei, dass der Android-Datenverkehr eher wie echte Benutzeraktivitäten aussieht, was zu einer stabileren Einrichtung und weniger Zugriffsproblemen führt.
Schlussfolgerung
Das Einrichten eines Proxys in Android ist einfacher als die meisten Benutzer erwarten - wenn man weiß, wo man suchen muss. Egal, ob Sie ihn über Wi-Fi, einen Browser oder eine spezielle Proxy-App konfigurieren, Android bietet flexible Optionen für unterschiedliche Anforderungen.
Der Schlüssel liegt in der Wahl der richtigen Einrichtungsmethode und der Verwendung zuverlässiger Proxy-Dienste. Mit der richtigen Konfiguration können Proxys den Zugang, den Datenschutz und die Netzwerkkontrolle auf Android-Geräten erheblich verbessern.