If you are seeing errors like “Unable to connect to the proxy server” or finding that your internet has suddenly stopped working despite a strong Wi-Fi signal, an incorrectly configured or leftover proxy is likely the culprit. While proxies are excellent tools for privacy and bypassing restrictions, a misconfigured or “ghost” proxy can act as a digital roadblock, cutting off your access to the web entirely.
This guide provides accurate, step-by-step instructions on how to disable proxy settings across every major platform — Windows, macOS, Chrome, Firefox, iPhone, and Android — helping you restore your connection fast.
Why and When You Need to Disable Your Proxy
A proxy server acts as an intermediary between your device and the internet. While useful in many scenarios, there are several specific situations where knowing how to turn off a proxy becomes essential.
- Troubleshooting Connection Errors: Most “No Internet” errors in browsers like Chrome or Edge occur because the browser is trying to reach a proxy server that is no longer active or responding.
- Réseaux de commutation : You might use a proxy at your office or school for security purposes, but once you take your laptop home, those settings prevent you from connecting to your personal Wi-Fi.
- Improving Speed: Low-quality or free proxies are often overloaded and throttle your bandwidth. Disabling them can instantly restore your connection to its native speed.
- Removing Malware Interference: Some malicious software and adware will force your computer to route traffic through a proxy in order to inject ads into your search results or track your data.
- Préoccupations en matière de protection de la vie privée : If you are no longer using a trusted provider, leaving an unknown proxy active means your data is passing through a third-party server you may not control.
How to Disable Proxy on Windows (10 & 11)
Windows provides a built-in proxy settings panel, accessible through the modern Settings app or via the Command Prompt for more persistent issues.
Method 1: Using Windows 11 Settings
- Presse Win + I to open Paramètres, or click the Démarrage button and select the gear icon.
- In the left sidebar, click Réseau et internet.
- Faites défiler vers le bas et cliquez sur Proxy.
- Sous Configuration automatique du proxy, toggle Détection automatique des paramètres à Arrêt.
- Sous Configuration manuelle du proxy, cliquez Set up next to “Use a proxy server,” turn the toggle Arrêt, and click Économiser.
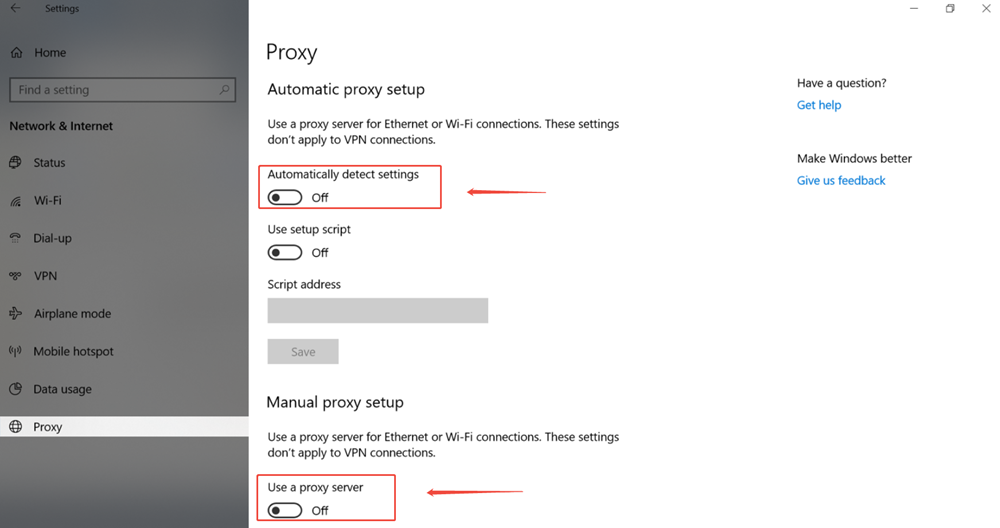
Method 2: Using Windows 10 Settings
- Presse Win + I to open Paramètrespuis cliquez sur Réseau et Internet.
- Sélectionner Proxy from the left-hand menu.
- Sous Configuration automatique du proxy, toggle off Détection automatique des paramètres.
- Sous Configuration manuelle du proxy, switch off Utiliser un serveur proxy.
Method 3: Resetting via Command Prompt (The “Expert” Fix)
If your proxy settings keep reverting to “On” after you disable them — often caused by a virus or a system glitch — you can force a system-wide reset using an elevated Command Prompt.
- Type
cmdin the Windows search bar, right-click Invite de commandeet sélectionnez Run as Administrator. - Type the following command and press Entrer:
netsh winhttp reset proxyThis clears any system-level proxy configuration and reverts your WinHTTP connection to a direct “DIRECT” access state, affecting all applications that rely on the Windows HTTP stack — not just your browser.
💡 Tip: If proxy settings are grayed out and unclickable on a corporate device, your company’s IT department has likely locked them via Group Policy. You will need to contact your administrator to make changes.
How to Disable Proxy on macOS
The steps differ slightly between macOS Ventura (13) and later versus older versions like Monterey (12) and earlier. In both cases, the goal is to ensure no proxy protocols are enabled under your active network connection.
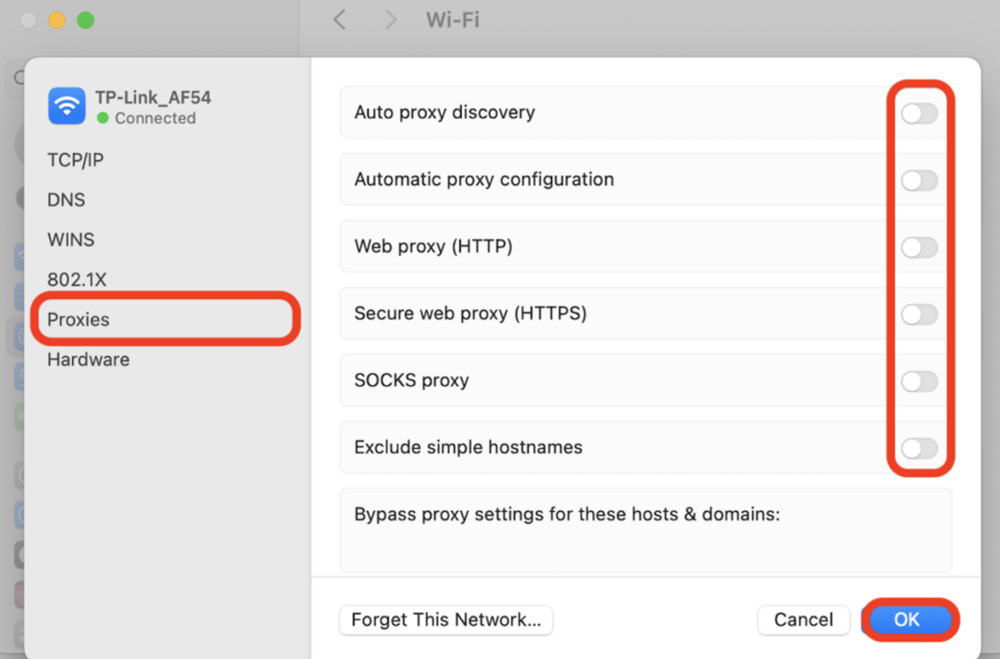
Steps for macOS Ventura (13), Sonoma (14), Sequoia (15), and Later
- Cliquez sur le bouton Menu Apple () in the top-left corner and choose Paramètres du système.
- Cliquez sur Réseau in the left sidebar.
- Select your active connection (e.g., Wi-Fi or Ethernet) from the list and click Details… on the right.
- Cliquez sur le bouton Proxies tab in the window that appears.
- Turn off all enabled toggles, such as Proxy Web (HTTP), Proxy Web sécurisé (HTTPS)et Proxy SOCKS.
- Cliquez sur OKpuis cliquez sur Appliquer in the main Network window. Enter your admin password if prompted.
Steps for macOS Monterey (12) and Earlier
- Aller à Menu Apple → Préférences du système → Réseau.
- Select your active connection in the left panel (e.g., Wi-Fi or Ethernet).
- Cliquez sur le bouton Advanced… button in the lower-right corner.
- Naviguez jusqu'à la page Proxies tabulation.
- Uncheck all boxes listed under “Select a protocol to configure.”
- Cliquez sur OKalors Appliquer.
💡 Tip: On macOS, proxy settings are per-network interface. If you switch between Wi-Fi and Ethernet, make sure to disable the proxy on both connections if needed.
How to Disable Proxy on Web Browsers
Most modern browsers — Google Chrome, Microsoft Edge, and Opera — automatically inherit your operating system’s proxy settings. Therefore, following the Windows or macOS steps above is usually sufficient. However, Mozilla Firefox is a notable exception, as it maintains its own independent proxy configuration.
| Browser | Proxy Source | Where to Change It |
|---|---|---|
| Google Chrome | Follows OS Settings | Settings → System → Open your computer’s proxy settings |
| Microsoft Edge | Follows OS Settings | Settings → System and performance → Open your computer’s proxy settings |
| Mozilla Firefox | Independent — must change manually | Settings → General → Network Settings → “No Proxy” |
| Safari (macOS) | Follows OS Settings | Change proxy settings in System Settings → Network |
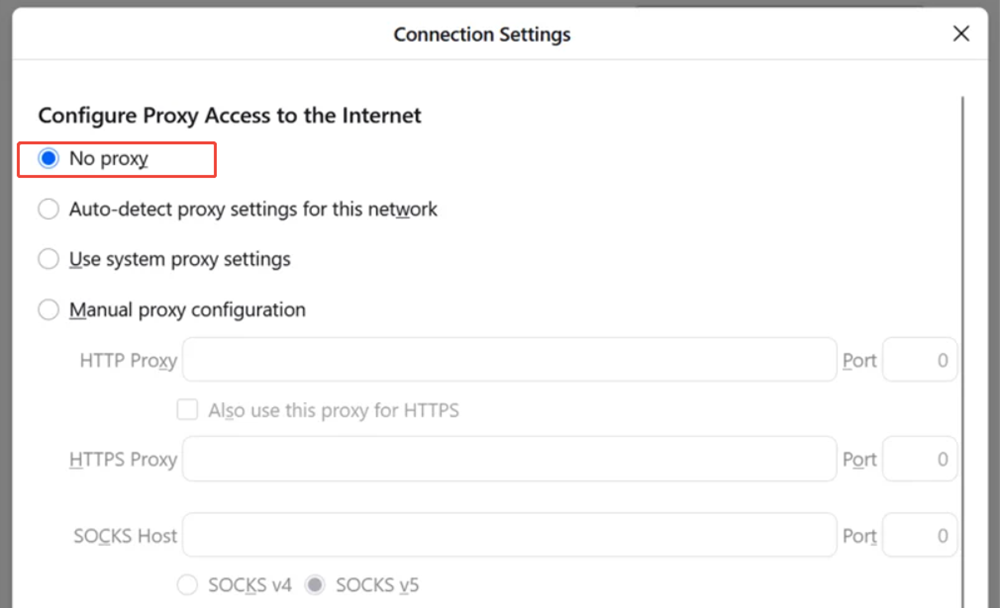
Specific Steps for Mozilla Firefox
If you can browse the web on Chrome but not on Firefox, Firefox’s internal proxy settings are likely misconfigured. Here is how to fix it:
- Click the three horizontal lines (☰) in the top-right corner and select Paramètres.
- Scroll to the bottom of the Général panel until you see the Paramètres du réseau section.
- Cliquez sur le bouton Paramètres... button.
- Sélectionnez l'option Pas de procuration radio button.
- Cliquez sur OK and restart Firefox.
Disabling Proxy Extensions in Chrome and Edge
Some browser extensions — particularly “Free VPN” or “Coupon Finder” add-ons — can silently override your system proxy settings from within the browser. To rule these out:
- In Chrome, navigate to
chrome://extensions/. In Edge, go toedge://extensions/. - Disable all VPN or proxy-related extensions using their toggle switches.
- Relaunch the browser and test your connection.
- If it works, re-enable extensions one at a time to find the culprit.
How to Disable Proxy on Mobile Devices (iOS & Android)
On mobile devices, proxy settings are tied to individual Wi-Fi networks. If you move from a coffee shop with a captive portal to your home network, the proxy might remain enabled even though you have changed locations.
Disabling Proxy on iPhone and iPad (iOS / iPadOS)
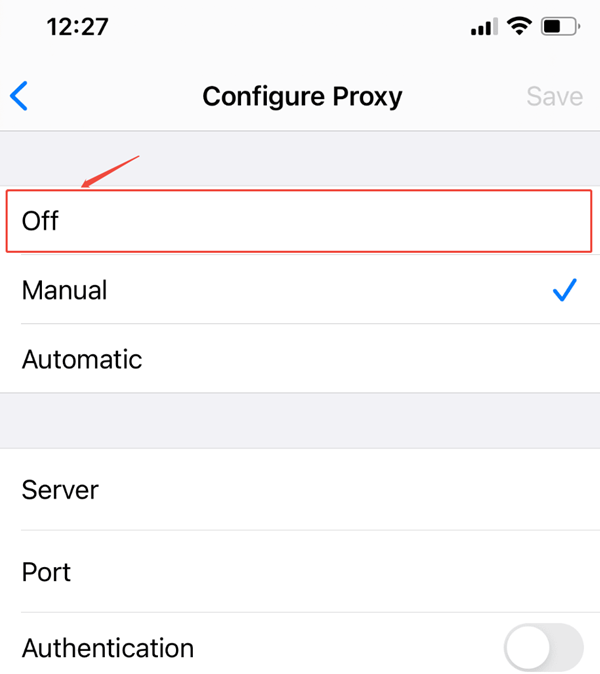
- Ouvrir le Paramètres app and tap Wi-Fi.
- Appuyez sur la touche (i) information icon next to the Wi-Fi network you are currently connected to.
- Scroll down and tap Configurer le proxy (listed under HTTP Proxy).
- Sélectionner Arrêt.
- Robinet Économiser if prompted, then exit Settings.
💡 Note: iOS proxy settings apply only to Wi-Fi connections and must be configured separately for each network. Cellular (4G/5G) connections do not use this proxy setting.
Disabling Proxy on Android
The exact navigation path varies by manufacturer (Samsung, Google Pixel, Xiaomi, etc.), but the general steps are as follows:
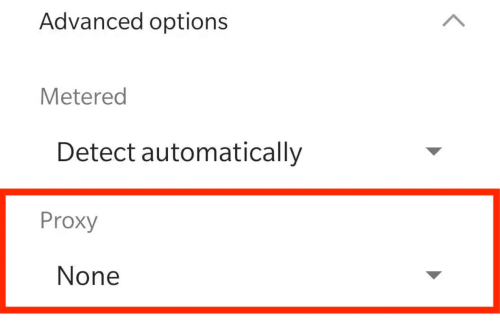
- Ouvrir Paramètres et se rendre sur le site Réseau et internet (some devices label this Connexions ou Wi-Fi).
- Robinet Wi-Fi, then tap and hold (or tap the gear/pencil icon next to) your current network.
- Robinet Options avancées ou View more to expand the settings.
- Find the Proxy dropdown and change it to Aucun.
- Robinet Économiser.
💡 Samsung Tip: On Samsung Galaxy devices running One UI, go to Settings → Connections → Wi-Fi → tap and hold your network → Manage network settings → Show advanced options → Proxy → None.
For Developers: Additional Proxy Locations to Check
If you work in a development environment, disabling the system proxy alone may not be enough. Proxy configurations can also live in developer tools and shell-level environment variables. Here are the additional places to check:
Git Proxy Settings
If you are using Git and experiencing connectivity issues (e.g., git clone ou git push failing), Git may have its own proxy stored in its global configuration. To remove it, open your terminal and run:
git config --global --unset-all http.proxy
git config --global --unset-all https.proxy
You can verify that the proxy has been removed by running git config --global --list and checking that no http.proxy entries remain.
System Environment Variables (Windows)
Some applications — including Node.js, Python, and many CLI tools — read proxy settings from system environment variables rather than the Windows Settings panel. If a proxy persists for these tools even after following the steps above:
- Cliquez sur le bouton Démarrage menu and search for “Edit the system environment variables.”
- In the System Properties window, click Environment Variables…
- In both the “User variables” and “System variables” sections, look for entries named
http_proxy,https_proxy,HTTP_PROXYouHTTPS_PROXY. - Select each one and click Delete.
- Cliquez sur OK and restart any open terminals or applications.
System Environment Variables (macOS / Linux)
On macOS and Linux, proxy environment variables are often set inside shell configuration files. Check the following files for any proxy-related lines:
~/.bashrc
~/.zshrc
~/.bash_profile
~/.profile
Open the relevant file in a text editor and remove or comment out any lines containing export http_proxy=, export https_proxy=, or similar. Then reload your shell with source ~/.zshrc (or the relevant file) for the change to take effect.
Troubleshooting: “My Proxy Settings Keep Turning Back On”
This is a common and frustrating problem where you disable the proxy, but it re-enables itself automatically seconds later. This typically points to one of the following root causes:
1. Malicious Browser Extensions
Certain “Free VPN,” “Coupon Hunter,” or ad-injecting browser extensions have permission to modify your browser’s proxy settings — and some do so automatically. To diagnose this:
- In Chrome, go to
chrome://extensions/and disable all extensions. In Edge, go toedge://extensions/. - Check whether the proxy stays off. If it does, re-enable your extensions one at a time to identify the offending one.
- Remove any extension you do not recognize or no longer need.
2. Malware or Adware
Viruses and adware commonly hijack your system proxy settings in order to redirect your traffic through ad-injecting servers. If you suspect malware:
- Run a full system scan using a reputable antivirus program (e.g., Windows Defender, Malwarebytes).
- Review your installed programs (Windows: Settings → Apps → Installed apps) and uninstall anything unfamiliar.
- After cleaning, re-follow the proxy disable steps above.
3. Registry Corruption (Windows Only)
In some cases, proxy settings can be hard-coded directly in the Windows Registry, bypassing the Settings UI entirely. If you are comfortable with the Registry Editor:
- Presse Victoire + R, type
regedit, and press Entrer. - Navigate to the following path:
HKEY_CURRENT_USER\Software\Microsoft\Windows\CurrentVersion\Internet Settings- Look for a DWORD value named
ProxyEnable. Double-click it and set its value to 0. - Also check for a string value named
ProxyServerand delete it if it contains an unexpected address. - Close Registry Editor and restart your computer.
⚠️ Warning: Editing the Windows Registry incorrectly can cause serious system problems. Always create a restore point (Control Panel → Recovery → Create a restore point) before making registry changes.
4. Group Policy (Corporate/School Devices)
If you are on a device managed by an organization, the proxy may be enforced through Active Directory Group Policy. In this case, no manual change will stick — you must contact your IT administrator to have the policy modified or an exception granted.
Why Use a Professional Proxy Instead of Disabling It?
If you are looking to disable proxy settings because your current connection is slow, unstable, or keeps blocking access to certain sites, the problem may not be the proxy itself — it may be the quality of the proxy you are using.
Free or low-quality proxies are often overloaded, poorly maintained, and unreliable. In contrast, a professional proxy service like OkeyProxy provides high-speed residential IPs that integrate seamlessly with your system. Key advantages include:
- Automatic Failover: If one IP goes offline, the system automatically switches to another, so you never encounter a “Proxy Error” screen.
- Couverture mondiale : Access content from 200+ countries with ultra-low latency.
- Elite Anonymity: Unlike free proxies that can expose your real data, IP résidentielles from trusted providers make your traffic indistinguishable from that of a regular home user.
- Stabilité : Commercial proxies maintain uptime SLAs and dedicated support, whereas free proxies can disappear without warning.
Before you disable your proxy entirely, consider whether switching to a better provider might solve your problem without sacrificing the privacy and access benefits that a proxy provides.
Conclusion
Knowing how to disable proxy settings is a fundamental networking skill for anyone using the internet in 2026. Whether you are fixing a “No Internet” error on Windows 11, clearing out stale settings on macOS Sequoia, resetting your iPhone’s Wi-Fi proxy, or removing a leftover Git proxy configuration in your terminal, the steps are straightforward once you know where to look.
As a quick reference summary: on Fenêtres, head to Settings → Network & internet → Proxy; on macOS, go to System Settings → Network → Details → Proxies; on iOS, go to Settings → Wi-Fi → (i) → Configure Proxy; on Android, tap and hold your Wi-Fi network → Advanced options → Proxy → None. And for Firefox specifically, navigate to Settings → General → Network Settings → No proxy.
If the proxy keeps re-enabling itself, work through the troubleshooting checklist: check for rogue browser extensions, scan for malware, inspect the Windows Registry, and verify whether a Group Policy is enforcing the setting. By following this guide, you can ensure your connection remains direct, fast, and entirely under your control.